The manual, gesture by gesture.
Ten sections covering everything you do in Hardtack day to day, from adding a tin of beans to reading how many days your household would hold out. Around twelve minutes to read, or jump straight to the section you are missing.
Getting started
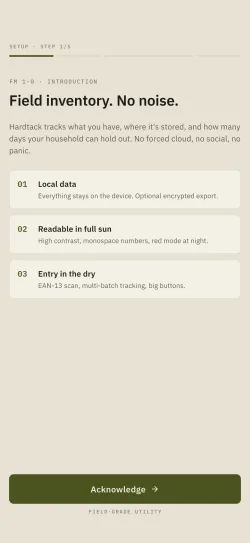
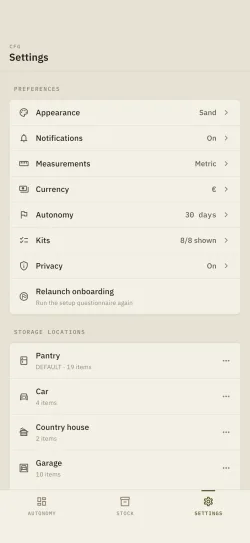
On first launch, a five-screen setup collects what the calculation needs. It takes two minutes, and you can run it again whenever you like from Settings → Preferences → Relaunch onboarding.
- An intro screen states the three principles: local data, readable in full sun, fast entry.
- Household: how many adults, children and pets. This is what sets the daily needs, so the whole days-of-supply calculation rests on it.
- Risks: what you are preparing for. It only drives the starter kit recommendation, it never filters your inventory.
- Goal: the number of days you are aiming for. Four common marks are offered, 3 days, 2 weeks, 1 month and 3 months, and any value between 1 day and 1 year is accepted.
- Summary: your reference profile, the recommended kit, and the Kits hidden line naming the ones your household will not use. You then land on the dashboard.
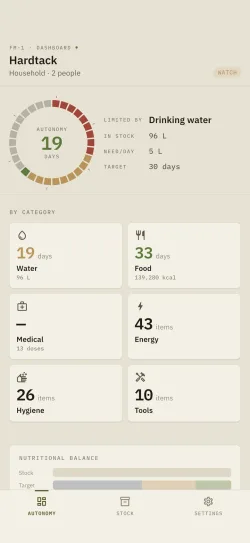
- Autonomy: the dashboard. Days covered, limiting factor, expiry alerts, kits and spending.
- Stock: your item list, the search field, the filters, the sort order and the Add or remove button (section 03).
- Settings: household, locations, kits, notifications, appearance, security, export and backup.
Adding an item
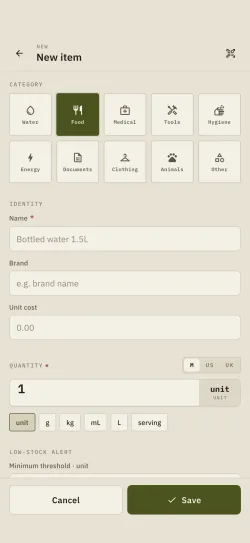
Everything starts with the Add or remove button at the bottom of the Stock tab. It opens three entries: two lead to the form for a new item, the third takes stock out and is covered in section 05.
- Open the Stock tab and tap Add or remove.
- Scan a barcode opens the camera. Frame the code: the app queries three public databases in order, Open Food Facts, then USDA, then UPCitemdb, and fills in whatever it finds, name, brand, nutrition values, net weight and Nutri-Score.
- Enter manually opens the same form, blank. That is the normal route for loose goods, home preserves and regional products.
- Scan to remove is the third entry. It creates nothing, it decrements: see section 05.
- Fill in what the scan cannot guess. Four fields really matter: Name, Category, Location and Quantity with its unit.
- Save. The item shows up in Stock straight away and enters the days-of-supply calculation.
- Expiration: the date drives the reminders and feeds the rotation view (section 04).
- Minimum threshold: feeds the shopping list (section 07).
- Unit cost: feeds the spending summary by category, on the dashboard.
- Notes: free text, never parsed, never sent anywhere.
Reading, filtering and sorting your stock
The Stock tab carries everything you need to find an item: a search field, a filter bar, a sort button and a switch between list and grid. It all sits on one screen, with nothing to go and find elsewhere.
- The field at the top, Name, brand or barcode, searches as you type. It works with no network, and you can paste a barcode into it.
- Right below, the chips filter: Category, Location, Expiring soon, Low stock. They combine, and Clear lifts them all at once.
- To the right of that bar, the sort button opens Sort by: Name, Soonest expiry, Quantity or Recently added.
- Next to it, the switch between List view and Grid view.
- Top right of the screen, a single icon, Shopping list (section 07), followed by the free-version item counter.
- At the bottom, the Add or remove button, covered in sections 02 and 05.
- Empty field and no active chip, and you have the full inventory. The sort order, however, stays applied.
- Grid view shows more items at once, at the cost of detail. It takes no swipe: to remove or delete from the grid, press and hold a card (section 05).
- Sorting by expiry puts what expires soonest on top. That is FIFO rotation without leaving Stock.
- The free version caps you at 10 items, and the counter top right tells you where you stand.
Expiry and rotation
The date goes in the Expiration section of an item. It is optional, and an item with no date will never trigger a reminder.
Hardtack does not separate a use-by date, which is a food safety limit, from a best-before date, which is about quality. Knowing which one you are entering is up to you: the second can be passed safely, the first cannot.
- Tap an item card in Stock to open it.
- Set the date in the Expiration section, then save.
- Two local notifications are scheduled automatically, 7 days before and 1 day before the date.
- Set the delivery time in Settings → Notifications, 9 a.m. by default, or switch the alerts off entirely.
- Everything coming due is listed under Autonomy → Alerts → See all, the Consume first screen.
- Dates falling on the same day are grouped into one notification, not ten.
- The rotation screen sorts into four groups: Expired, This week, This month, Later.
- The dashboard counts what expires within 30 days separately from what has already expired.
- No reminders coming through? Check the permission in your system settings first, a refusal on first launch is never asked again on its own.
- On Android, some manufacturers suspend scheduled tasks for apps put to sleep. Take Hardtack out of battery optimisation so the reminders go out on time.
Taking stock out, fixing, deleting
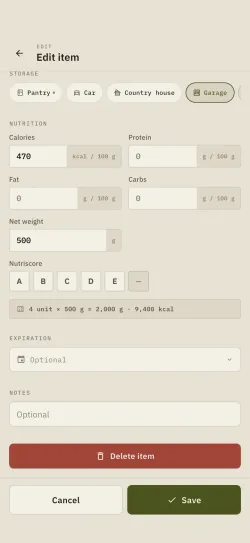
Three gestures worth keeping apart. Taking stock out decrements a quantity, fixing edits the item, deleting removes it for good.
- Take stock out: swipe the card to the right. A sheet asks how much went out, and the message that follows offers to undo. The gesture is free and unlimited.
- Fix: tap the card, change what needs changing, save.
- Delete: swipe the card to the left, then confirm. The swipe asked for is deliberately firmer than the previous one.
- Grid view takes no swipe. Press and hold a card instead: a sheet opens with Remove from stock and Delete. Press and hold works in list view too, if you prefer the gesture.
- To wipe everything at once, Settings → Danger zone → Clear inventory. Back up first, the operation is final.
- Taking out an item already at zero does not open the sheet, a message says so.
- Deleting an item takes its expiry date and the matching reminders with it.
- The scanner carries an Add / Remove switch at the top of the viewfinder, and the third entry of the Add or remove button, Scan to remove, opens it on the right side already. Every code read then decrements the stock without leaving the camera, which is fast on the way back from the shops. That switch is part of the full version, unlike removing stock by hand.
Storage locations and categories
An item lives in a location you create and name, and in a category picked from a fixed list. The difference between the two is not cosmetic.
- Open Settings → Storage locations → Add a location.
- Pick an archetype, pantry, garage, go-bag, cellar, vehicle, cabin or custom. It only sets the icon.
- Name it whatever you want, up to 50 characters.
- To rename or delete a location, tap its row in the same list.
- A location that still holds items cannot be deleted. Move them out first, item by item, from their own screen.
- The ten categories, water, food, medical, tools, hygiene, energy, documents, clothing, animals and a catch-all, cannot be created or renamed. The days-of-supply engine has to know for certain what counts as water and what counts as medication.
- The free version covers one location, the full version takes as many as you need.
Minimum thresholds and the shopping list
The shopping list is not filled in by hand. It is the consequence of one number you set once per item, the minimum threshold.
- Open an item, fill in Minimum threshold, save.
- As soon as the quantity drops below that threshold, the item joins the list with the gap to close, along the lines of “Need 4 L”.
- Open the list from the Shopping list icon, the only one in the Stock header.
- Share list sends it as plain text through your phone’s share sheet, into a message, a note or an email.
- An item with no threshold never shows up in the list. That is deliberate: not everything is meant to be restocked.
- The list recomputes itself on every quantity change, including after stock is taken out.
- It is available in the free version.
Days of supply
That is the large number at the top of the Autonomy tab. It answers one question: how many days your household would hold out with what it has right now.
Three axes are computed separately, water, calories and medication. For each one, the app divides the stock by the household’s daily need and rounds down. The figure shown is the smallest of the three, and the axis responsible is named right below it, under Limited by.
- Open Settings → Household and add one profile per person and per pet.
- Adjust everyone’s daily needs. Defaults are 2.5 L of water and 2,000 kcal per adult, 1.5 L and 1,500 kcal per child, 0.5 L per pet.
- Set your target in Settings → Preferences → Autonomy goal. It colours the status, Operational, Watch or Critical, and never changes the calculation itself.
- Fill in the nutrition values of your items to sharpen the result. Once enough of the stock is documented, the calorie axis splits into carbohydrates, fat and protein.
- An axis with no declared need is ignored, not counted as zero.
- Pets count on the water axis and never against human calories. Their food is tracked in the Animals category.
- The overall figure and its limiting factor stay visible in the free version. The axis-by-axis and category breakdowns are part of the full version.
Ready-made kits
Eight starter kits cover the usual preparations: 72-hour bag, vehicle, earthquake, power outage, everyday carry, infant, pets and first aid. They are starting points, not a fixed catalogue: every one of them can be hidden, reordered, renamed and edited line by line. They stay independent from your inventory, ticking a line consumes nothing and changes no quantity.
- Kits live on the Autonomy tab, each showing its completion percentage. The Manage action at the head of the section opens the management screen.
- Tap a kit to open it and tick what you already own.
- A long press on a dashboard card hides that kit, and the message that follows offers to undo.
- Inside an open kit, the Edit button in the header opens edit mode: tap a line to rename it, drag to reorder, Add a line creates one. The same button becomes Done to leave.
- The actions menu, right next to it, carries Rename, Duplicate, Hide from the dashboard, Restore the original kit and Delete this kit.
- Settings → Preferences → Kits opens the same management screen: which kits show, in what order, and Create a kit.
- Hiding and reordering are free. Two kits even hide themselves at the end of setup, the pet one if you have no pets and the infant one if you have no children: a fresh dashboard therefore shows six of the eight, not eight.
- The 72-hour kit is open in the free version, editing included. The other seven, plus creating and duplicating, are part of the full version.
- “Reset the order” appears at the bottom of the management screen as soon as you have moved at least one kit.
Backing up, exporting, protecting
There is no account, no server and no synchronisation. The trade-off is plain: backing up is your job, not a cloud’s.
- Settings → Export & backup → Full backup writes a file you keep wherever you want, in Files, on a drive, or in the service of your choice.
- Restore a backup reads that file back. Restoring adds to the existing inventory, it does not overwrite it.
- Export as CSV produces a table any spreadsheet can read. It is an output format, it cannot be imported back.
- Export as JSON produces the same content in structured form, and that one can be imported.
- Share inventory displays an encrypted QR code, which Import inventory reads on the other phone. Nothing goes over the network, the two devices talk through a screen and a camera.
- App lock with a PIN or biometrics, under Settings → Security.
- Obfuscate names replaces item names with “Item 1, Item 2…” on the browsing screens, without touching the data.
- Decoy mode: a second code opens a plain, read-only list, and your real data stays out of sight.
- Export, backup and those three protections are part of the full version.
- Settings → About → Write to us prepares a support message in your own mail app, with a short technical block you see before sending. The app never sends it itself.
When something does not work
The wider questions, what leaves the device, how the calculation is run, what the free version contains, are answered in the FAQ, and the full list of what the app does is on the Features page. If the problem holds out, the simplest route is Settings → About → Write to us inside the app: the draft comes out with the version and the platform already filled in, which saves us a round trip. Otherwise write to us at atech.contact@proton.me, reply within 48 business hours.
This guide describes version 1.0. If a screen does not match what is written here, check the version number at the bottom of Settings before writing to us, it saves a round trip.